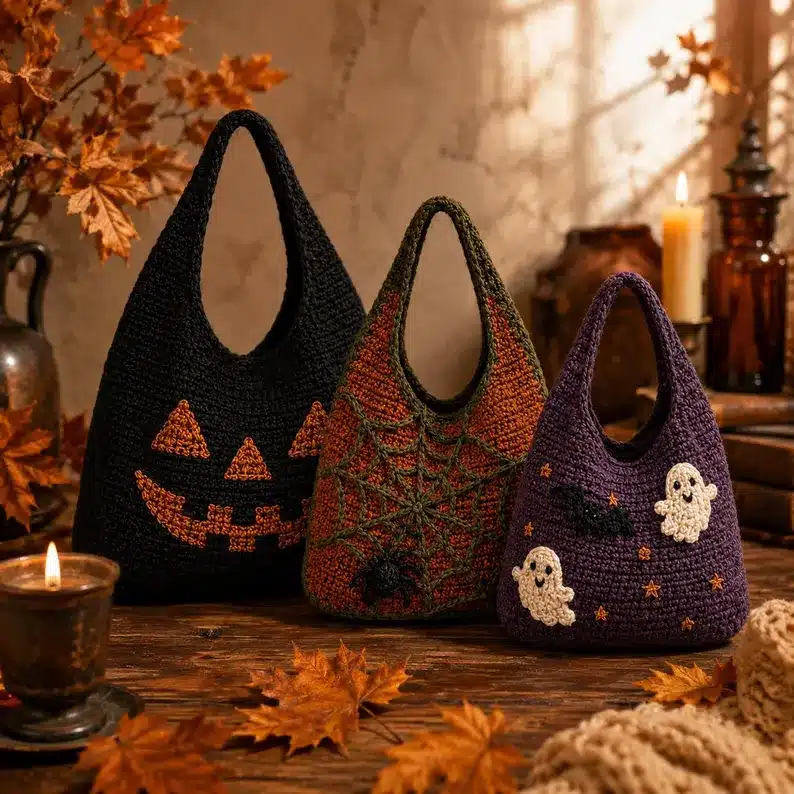
Looking for a fun Halloween crochet project? These three spooky crochet bags are perfect for beginners and make wonderful handmade accessories for Halloween parties, trick-or-treating, fall markets, or everyday use.
From a classic jack-o’-lantern to a spooky spiderweb bag and a cute ghost design, you can customize each project with your favorite Halloween colors and decorations.
🧶 Materials You’ll Need
Before starting, gather:
- Medium or chunky crochet yarn
- Crochet hook appropriate for your yarn
- Yarn needle
- Scissors
- Stitch markers
- Black yarn
- Orange yarn
- Purple yarn
- Green or brown yarn
- Small amount of white yarn
- Optional: felt for decorations
- Optional: fabric lining
🎃 Project 1: Halloween Pumpkin Crochet Bag
The first bag features a classic black base with orange pumpkin details. It’s a simple design that creates a strong Halloween look without requiring complicated stitches.
Step 1: Crochet the Bag Body
Start with your black yarn.
- Make a foundation chain for the desired width.
- Work single crochet stitches along the chain.
- Continue working rows or rounds until the bag reaches your preferred height.
- Keep your stitches tight and even for a sturdy bag.
Step 2: Shape the Handles
Create two long handles using black yarn.
Work several rows of single crochet over the foundation chain to make the handles thicker and stronger.
Attach each handle securely to both sides of the bag.
Step 3: Add Pumpkin Decorations
Using orange yarn, crochet or embroider small pumpkin shapes onto the front.
Add:
- Small triangular eyes
- A pumpkin nose
- A spooky smiling mouth
For an extra Halloween touch, add small orange pumpkins around the front of the bag.
🕷️ Project 2: Spooky Spiderweb Crochet Bag
The second design combines autumn colors with a dramatic spiderweb decoration.
Step 1: Create the Bag
Use a combination of rust orange, dark brown, green, or black yarn.
Crochet the main body using simple stitches such as single crochet or half-double crochet.
Continue until you reach your desired bag size.
Step 2: Crochet the Handles
Make two matching handles and attach them firmly to the sides.
For a more decorative look, use two colors together while crocheting the handles.
Step 3: Create the Spiderweb 🕸️
Use black yarn to create the web.
Start from the center and work outward:
- Create several lines radiating from the center.
- Connect the lines with curved or angled sections.
- Continue until you have a web large enough for the front of the bag.
- Sew the finished web securely onto the bag.
Step 4: Add a Spider
Make a small black crochet spider or use black yarn to embroider one.
Place it near the center or bottom of the web.
Tip: You can use fuzzy yarn for the spider to give it a more textured appearance.
👻 Project 3: Cute Ghost Crochet Bag
The purple bag is perfect if you prefer a cute rather than scary Halloween style.
Step 1: Crochet the Purple Bag
Begin with purple yarn and create the bag body using basic crochet stitches.
Work evenly until the bag reaches your desired size.
Step 2: Add the Handles
Crochet two sturdy purple handles.
Sew them securely onto the bag, reinforcing the attachment points.
Step 3: Make the Ghosts
Using white yarn:
- Crochet a small oval or rounded ghost body.
- Add a slightly wavy bottom edge.
- Embroider two black eyes.
- Add a small smiling mouth.
- Sew the ghost onto the front of the bag.
Make two ghosts in different sizes for a playful look.
Step 4: Add Tiny Stars
Use orange and yellow yarn to add small stars or sparkle shapes around the ghosts.
This creates the magical Halloween-night effect shown in the inspiration image. ✨
🧵 Step 5: Finish Your Crochet Bag
Before using your bag, check all of your finishing details.
- Weave in loose yarn ends.
- Reinforce the handles.
- Check that all decorations are securely attached.
- Trim excess yarn.
- Add a fabric lining if desired.
- Gently reshape the bag.
A lining is especially useful if you plan to use the bag for candy or heavier items.
🎃 Easy Ways to Customize Your Bags
You don’t have to copy the colors shown in the image.
Try these combinations:
Classic Halloween:
🖤 Black + 🧡 Orange + 🤍 White
Cute Halloween:
💜 Purple + 🩷 Pink + 🤍 White
Spooky Witch:
💜 Purple + 🖤 Black + 💚 Green
Autumn Style:
🍂 Rust + Brown + Cream
Ghost Theme:
🖤 Black + 🤍 White + 💜 Purple
🧶 Beginner Crochet Tips
If you’re new to crochet, start with simple stitches such as single crochet and half-double crochet.
Don’t worry about making every decoration perfectly symmetrical. Handmade details are part of the charm!
For your first project, choose a simple bag shape and add the Halloween decorations afterward. This makes the project easier to manage and lets you focus on one technique at a time.
👻 Which Halloween Bag Will You Make?
Whether you choose the pumpkin bag 🎃, spiderweb bag 🕷️, or ghost bag 👻, these projects are a fun way to bring handmade Halloween style to your wardrobe.
They’re also great projects for:
- Halloween craft fairs
- Handmade gifts
- Trick-or-treating
- Kids’ Halloween accessories
- Fall crochet collections
- Etsy handmade shops
- Halloween parties
Save this tutorial to your Pinterest board and come back when you’re ready to crochet your spooky new bag! 🧶🎃