
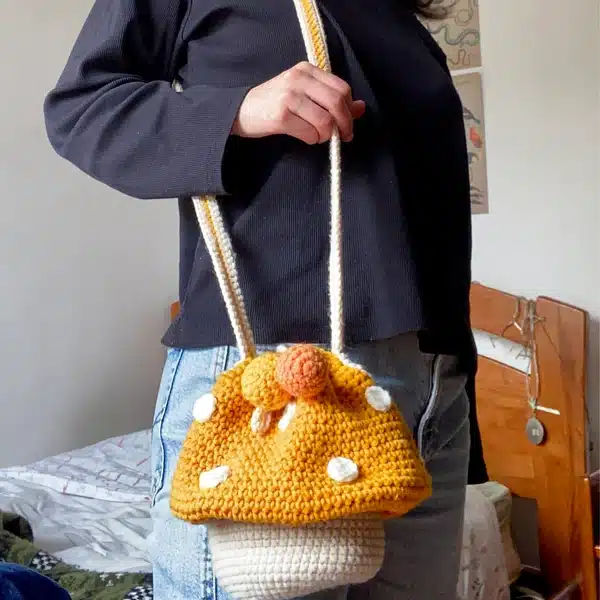
How to Make a Cute Crochet Drawstring Bag – Step-by-Step Tutorial
Small crochet bags are fun projects because they can be completed relatively quickly while giving you plenty of opportunities to experiment with colors and decorations.
This cute crochet drawstring bag features a bright yellow body, a contrasting cord, decorative crochet flowers, and a long shoulder strap.
It is a great project for creating a playful handmade accessory.
Materials You’ll Need
- Yellow crochet yarn
- White crochet yarn
- Small amounts of orange or peach yarn
- Crochet hook
- Yarn needle
- Scissors
- Stitch markers
- Cord or crochet chain for the drawstring
- Yarn for the shoulder strap
Step 1: Crochet the Bottom
Begin by creating a small foundation chain.
Work crochet stitches around the chain to form an oval-shaped bottom.
Continue increasing around the ends until you have the desired width.
For a small purse, keep the base compact. For a larger bag, continue increasing for additional rounds.
Step 2: Build the Main Body
Once the bottom has reached the desired size, stop increasing.
Continue crocheting evenly around the base.
This will cause the stitches to begin forming the vertical walls of the bag.
Continue until the bag reaches your preferred height.
Step 3: Create the Rounded Shape
To reproduce the soft shape of the inspiration bag, keep the tension consistent while crocheting the sides.
Avoid adding unnecessary increases once the base is complete.
The body should gradually form a rounded pouch.
Step 4: Add Decorative Flowers
Create several small crochet flowers using contrasting yarn.
For example, you can use:
- White petals
- Orange or peach centers
- Yellow accents
Attach the flowers to the front of the bag using a yarn needle.
Arrange them evenly for a balanced handmade appearance.
Step 5: Make the Drawstring Channel
At the upper portion of the bag, create a round or two of stitches that will allow the drawstring to pass through.
Leave enough space between the stitches for the cord to move freely.
This channel will allow you to open and close the purse easily.
Step 6: Make the Drawstring
You can create the drawstring using either:
Option 1: A simple crochet chain.
Option 2: A twisted yarn cord.
Make the cord long enough to pass through the entire opening and leave enough length on both sides for tying.
Carefully weave the cord through the drawstring channel.
Step 7: Create the Shoulder Strap
Make a long crochet chain for the shoulder strap and reinforce it with additional rows of crochet stitches.
The strap should be strong enough to support the small bag.
Measure it against your body before attaching it.
Step 8: Attach the Strap
Attach one end of the strap to each side of the bag.
Make sure both attachment points are positioned at the same height.
For extra strength, reinforce the connection several times with yarn.
Step 9: Hide the Loose Ends
Use a yarn needle to weave all loose yarn ends into the inside of the crochet stitches.
Trim the excess yarn carefully.
This small step makes a huge difference in the professional appearance of the finished bag.
Step 10: Shape and Finish the Bag
Gently shape the bag with your hands.
Adjust the flowers, straighten the strap, and test the drawstring.
Pull the cord closed and check that the opening gathers evenly.
Your cute crochet drawstring bag is now ready!
Customize Your Crochet Bag
You can easily create different versions by changing the colors.
Try:
🌸 Pink + cream
🌿 Green + white
💜 Purple + lavender
🧡 Orange + cream
💙 Blue + white
🤎 Brown + beige
You can also replace the flowers with hearts, stars, leaves, or other small crochet motifs.
Final Thoughts
This cute crochet drawstring bag is a fun handmade accessory and a great project for practicing basic crochet construction and decorative techniques.
Save this tutorial for your next crochet project and follow Luna Crochet Bags for more handmade bag ideas, crochet tutorials, and creative designs.