
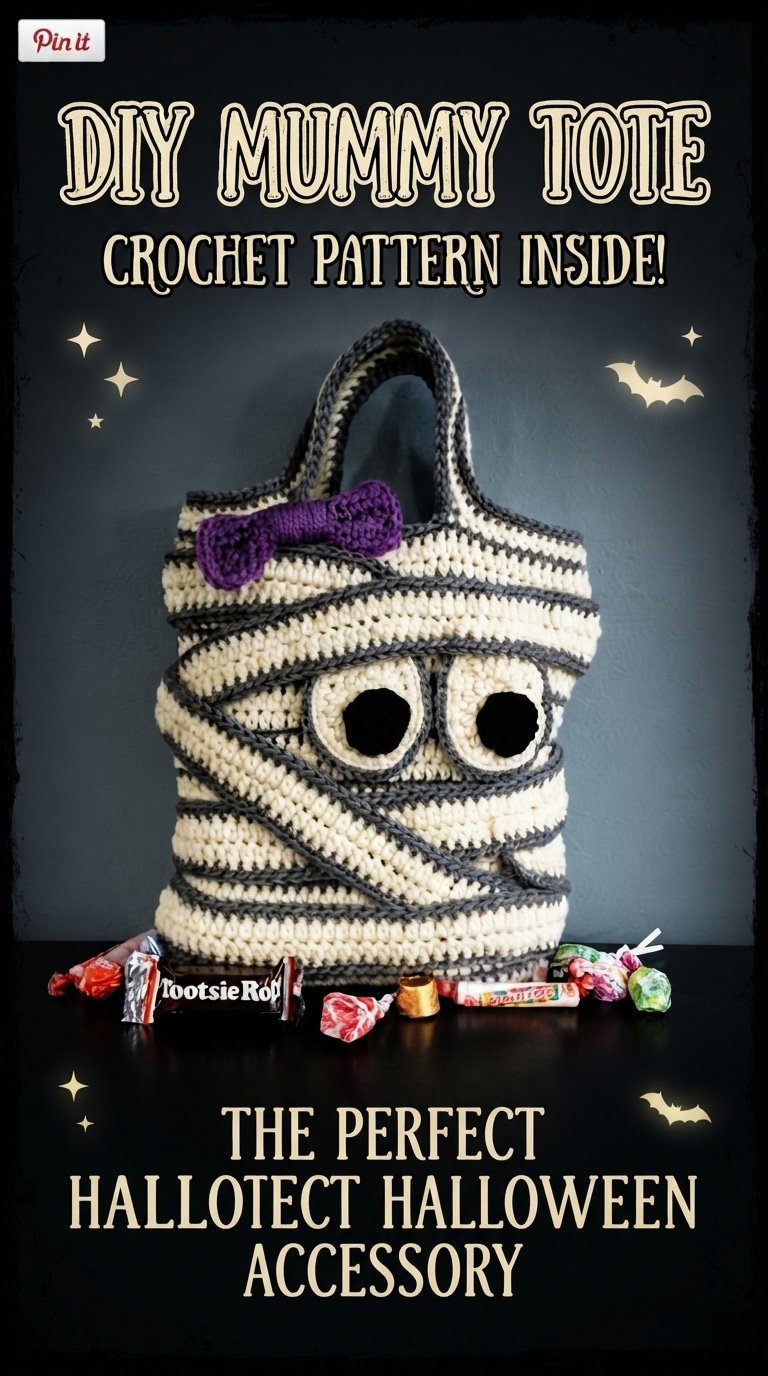
Turn a simple crochet tote into a spooky and adorable Mummy Tote Bag—perfect for Halloween parties, trick-or-treating, fall markets, or carrying your everyday essentials. This project combines cozy cream-colored crochet with dark gray “mummy bandages,” big googly-style eyes, and a cute purple bow.
Note: The image is a visual inspiration, so the instructions below are a practical DIY guide for creating a similar mummy tote rather than an exact stitch-by-stitch reproduction of the pictured bag.
🧶 Materials You’ll Need
- Cream or off-white chunky yarn
- Dark gray or black yarn
- Purple yarn for the bow
- Crochet hook suitable for your yarn
- Yarn needle
- Scissors
- Stitch marker
- Fiberfill stuffing
- Black felt or black yarn for the eyes
- Optional: fabric lining
- Optional: sewing needle and thread
Step 1: Crochet the Tote Bag Base
Start by making a sturdy rectangular or oval base using the cream yarn.
- Create a foundation chain wide enough for your desired bag.
- Crochet around the chain to create an oval base.
- Continue working rounds of single crochet.
- Keep crocheting without increasing once the base reaches your desired width.
- Continue upward until the bag reaches the height you want.
Tip: Use tight, even stitches to create a firm tote that can hold candy, yarn, books, or other small items.
Step 2: Build the Mummy Body
Once the main tote is finished, continue with cream yarn to create the mummy’s body.
The goal is to make the bag look like it has been wrapped in old mummy cloth.
Keep the stitches relatively uniform, but don’t worry if the finished piece isn’t perfectly smooth—the slightly handmade appearance adds to the spooky character.
Step 3: Add the Mummy Bandages
This is the detail that gives the bag its signature look.
Using dark gray or black yarn:
- Create long crochet strips or chains.
- Position them diagonally across the front of the bag.
- Wrap the strips around the body in different directions.
- Sew or crochet the strips securely into place.
- Leave small areas of cream-colored crochet visible between the bandages.
Try using different angles and spacing so the mummy looks naturally wrapped.
👻 Design Tip
Don’t make every bandage perfectly straight. Slightly uneven diagonal strips will make your mummy look more playful and handmade.
Step 4: Crochet the Mummy Eyes 👀
The eyes are the most important character detail.
For each eye:
- Crochet a small cream-colored circular piece.
- Work several rounds until you have the desired size.
- Add a black center using black yarn or felt.
- Slightly stuff the eye if you want a raised 3D effect.
- Sew the eyes onto the front of the tote.
Position them close together and partially underneath the mummy bandages.
This creates the cute “Who is watching me?” expression.
Step 5: Make the Tote Handles
Using the cream and dark gray yarn, create two sturdy handles.
You can:
- Crochet long chains and work several rows of single crochet over them, or
- Make thick tubular crochet handles.
Attach each handle securely to opposite sides of the bag.
For a stronger tote, sew the handles several times and reinforce the attachment points from the inside.
Step 6: Make the Purple Bow 🎀
The little purple bow adds a fun contrast to the spooky mummy design.
Simple Crochet Bow
- Chain approximately 15–20 stitches.
- Work several rows of single crochet.
- Fasten off and weave in the ends.
- Fold the rectangle in the middle.
- Wrap purple yarn tightly around the center.
- Adjust the loops until you have a cute bow shape.
- Sew the bow onto one side of the tote.
You can also use black, orange, burgundy, or Halloween-patterned yarn instead of purple.
Step 7: Add the Finishing Details
Now it’s time to give your mummy tote some personality.
Check that:
- The eyes are firmly attached.
- The bandages are securely sewn.
- The handles are strong.
- All yarn ends are woven in.
- The bow is firmly attached.
- The bottom of the bag is sturdy.
For an extra professional finish, add a simple fabric lining inside the tote.
Step 8: Style Your Halloween Mummy Tote 🎃
Your finished bag can be used as:
- 🍬 Halloween candy bag
- 🎃 Trick-or-treat tote
- 🧶 Crochet project bag
- 📚 Cute book bag
- 🛍️ Reusable shopping bag
- 👻 Halloween party accessory
- 🎁 Handmade Halloween gift
Place a few wrapped candies inside and you’ve got the perfect spooky presentation!
🎃 Easy Customization Ideas
Make your mummy unique by experimenting with different colors.
Classic Mummy:
Cream + charcoal gray + purple
Spooky Mummy:
Ivory + black + blood-red bow
Cute Mummy:
White + light gray + pink bow
Halloween Mummy:
Cream + orange + black
Gothic Mummy:
Off-white + black + dark purple
🧵 Beginner Crochet Tips
If you’re new to crochet, don’t worry!
Start with basic stitches such as chain stitch and single crochet. The mummy bandages are very forgiving, so small imperfections can actually make your finished bag look more realistic.
Before attaching the eyes and decorations, lay everything on the bag first and experiment with the placement.
Most importantly: have fun with it! 👻
🎃 Final Result
And there you have it—a spooky DIY Mummy Tote Bag that’s cute, practical, and perfect for Halloween!
The combination of chunky crochet texture, messy mummy bandages, oversized eyes, and a colorful bow makes this project especially fun for Halloween craft lovers.
Save this idea to your Halloween crochet board and make your own spooky mummy tote! 🧶🎃👻